Rocket Club Developer Pages
Textures and Materials
Home Page
Community:
Bulletin Board
Developer Pages:
Overview
Developers:
Development_Notes
| So,
what's a Texture anyway? Textures are what make models pretty. <insert exciting graphic here> A 3D model without texturing is generally boring to look at, since it is all one color. Under some lighting conditions you might not even be able to make out its cool 3D shape. Think of the model as a plastic model kit you have just glued together. It has shape (called geometry in this context), but it is all one color. Texturing your model is like painting that plastic model. You generally add detail which is missing from the geometry. For example, a section of the model might really be completely flat, but if you paint some interesting lines on it, it suddenly looks like there are some pipes running along the side of it. |
| Well,
then, what's a Material? Well, I don't pretend to be a 3D guru, and I used to use the two terms inter-changeably, but nowadays I think the distinction is that a texture is just the 'painting' you put on the model. A material can have other aspects, like how it reflects light. So a 'rubbery' material looks different from a 'wooden', 'metallic', or 'wet' material. Some materials are shiny, some dull. Some are semi-transparent. So a material is a description of how you want the surface to react to light. That includes a texture image, but also a bunch of funky numbers. When you use MilkShape to design your model, you will create one or more materials to be used in various places on your model (cockpit might use a different material than the engine pod, for example) Milkshape will let you specify, for each material, texture images *and* the funky material control values. |
| Well,
then I do it all with Milkshape, right? Pretty much. The tricky part comes from two aspects of rocket club. One is the fact that texture files must be named a certain way and put in very particular folders. The other issue is that you may want to re-use the same model in several different plans. (Think RED ship versus BLUE ship). You want the same geometry, but different materials. Perhaps you want to put your Club's logo on the wings. The materials that you set up when using MilkShape are the 'baked in' materials. These will be used if the PLAN file doesn't call out something else. The most important thing for you to remember about this is: when designing your milkshape models, be sure to give every material a name. That's easy to do, and makes life easier later. If you only use one material in your model, call it 'base' just to make life even easier. If you forget, you can re-open your model in milkshape, rename the material(s) and then re-export it as a MilkShape 3D ASCII file. |
| So, How
do I set up a material in MilkShape anyway? You will have to check out the MilkShape tutorials to learn how to use MilkShape. But when you get to the part where you need to find the name of a file to use for the texture picture (the DiffuseTexture, in particular), use the BROWSE button and rummage around in your rocketClub\Assets folder until you find the texture you need. If you like, you can make a separate folder in some convenient place on your disk, and drag all your favorite texture files there, to make them easier to find while inside of MilkShape. Remember that all Rocket Club asset files should start with the creators Serial Number as the first 8 characters, followed by a decimal point. As in 12345678.myShipTexture.jpg. This allows you to work with copies of the file in any location, but the game will always look for them in a very particular location: rocketClub\Assets\12345678\Textures If you create new textures, be sure to drag a copy of them to your own Rocket Club asset folder so that they will automatically get shared with the other players. This is probably confusing, but you'll get the hang of it soon enough, I'm sure. And if you use any funny characters in your asset names, remember, it's going to be a BIG LAUGH when no one can see them. Keep it to a-z, 0-9, and decimal points. And the decimal points must be just for the official purposes, not for: 'look at me mom, I made a file with a goofy name!' |
| Um, if
I do that, won't Rocket Club look in the wrong
place for the Texture? This is a real possibility, so you need to carefully follow the rules: 1.) When making a new texture file, give it a name which starts with "12345678." where the number is your Serial Number (in hexadecimal if you have a Golden Soul). Don't create new textures using someone else's serial number. And don't forget the decimal point after the serial number. 2.) You can keep the master copy of your textures in some safe place, and when using MilkShape you can browse to that place if you like. I use one folder that has all my milkshape .ms3d files, the textures I use, and the exported models. It's very convenient. It's what I back up. 3.) When a texture is ready to be shared, drag a copy of it to your own assets\texture folder (that's rocketClub\Assets\12345678\textures) Other people and star servers will then automatically fetch it from you when they need it. |
| I'm
still confused.. how does it actually work? OK, Here are the details: When you are done making your model in MilkShape, and have exported it as a MilkShape 3D ASCII file (and stuck it in your own rocket club assets\models folder), if you were to look inside of it, after waking back up, you would see that each material has:
You might see something else for the .\ (which means the texture is in the same folder as the model). However, in rocket club, the texture is NEVER in the same folder as the model. (Get it out of there!) You can keep them in the same folder for your 'master copies' when using MilkShape, but at runtime, in Rocket Club, they come from two different folders. So, when RocketClub loads your model file, it translates the DiffuseTexture name so as to get the full path to the actual texture file to be used. The first thing it does is throw away everything up to that slash. Then it looks at "12345678.myTexture.bmp" and says.. well.. I know this is a texture, so I will just look in serial number 12345678's texture assets. So the actual file name used becomes: rocketClub\Assets\12345678\textures\12345678.myTexture.bmp Cool, huh? this is why it is criticial that you always start your texture name with your 8 digit hexadecimal serial number and a period. Have I said that enough times yet? |
| OK,
Let's pretend I understood that... how do I
override the baked-in materials? Good Question! It's done with your PLAN file. Remember, a PLAN file is the description of an object which can be dropped into the universe. It has tons of stuff in it, potentially. And not all plan files have all possible settings in them. But all plan files DO describe a 3D object, so they MUST include a 'model' setting (defines the geometry) and can OPTIONALLY include material overrides for named materials in the model. (un-named materials can NOT be overriden) So, without going into too many details about plan files, the bits of importance here are like this: Inside a PLAN file:
The GENERAL section called out the model (geometry) which is described elsewhere. It's a .txt file created by the MilkShape "export as Milkshape 3D ASCII" command. The MATERIAL-NAME sections (one per named material) contain overrides for individual materials. You must know the name of the material you want to override. You might have a second PLAN file:
Note that the only difference is the name of the diffuse texture. This would be a ship with the same geometry (shape), but a different painting on its hull. Also, please note that in PLAN files we always add the funky url prefix so that the PLAN file knows for sure what sort of asset we are talking about. It is easy to forget these (you don't need them when working inside of MilkShape, just here in the PLAN file).
And that's all there is to say about that for now. In the future, I will let you override other aspects of the materials, like their transparency. |
| Isn't
it a Bad Idea to use Multiple Materials With a
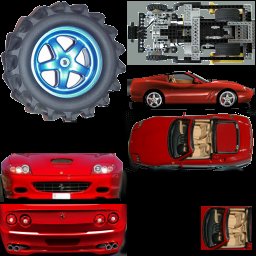
Single Object? Well, only in the sense that switching materials in mid-render is one of the most expensive operations you can ask your 3D card to do, so you will get better overall performance if you can use fewer texture files. If you look at my 'scooter' object you will see an example of multiple sections of the vehicle (wheels, top, bottom, sides, back) sharing a single texture image. So I have only a single material "Base" using a single texture file (scooter1.jpg) that has different parts of the car drawn in different sections. In Milkshape I then used the Texture Coordinate Editor to arrange which bits of the texture file were painted on which bits of the model. The texture file looks like this. Note: the texture file does NOT need to mirror the physical size relationships at all. IN general you probably want to use 'more' of the texture file for sections of the object where the extra resolution will be appreciated by the user. My tire texture, for example, is probably using much more of the texture sheet than it needs/deserves.
But I never claimed to be an artist. |