How To Play Rocket Club
Home Page
Download It!
Donate $
Community:
Bulletin Board
Developers:
Adding New Stuff
| The goal of
this page is to give you some clue as how to
actually play rocket club today. The
word 'play' carries with it some connotations
which may not be entirely justified in this
context, so let's just say "mess around
with." Please don't expect to have any FUN yet. This is for the curious. Also, it is to be expected that most of the UI will get re-done over time, so convince yourself it won't always be this clunky... yeah, right, I'll make it SUPER polished someday... yeah... For more general issues, you might check out the FAQs and the MIX forum.
The page is written while Rocket Club is very much a work in progress. Please check out the Rocket Club Development notes on the forum for a historic perspective on the project. You can also read specific instructions for adding new objects to the world. |
| WHAT IS
COVERERED HERE ----------------------------------- Getting Started:
Playing:
Being a Rocket Club Developer |
| WHAT IS ROCKET CLUB? ----------------------------------- Rocket Club is (will be) a multiplayer online game involving exploration, creation, destruction, and commerce. You can read more about this on the Rocket Club Forum.
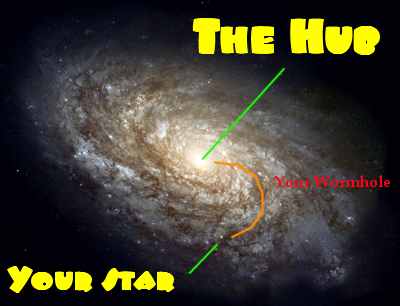
The Rocket Club universe consists of one or more Galaxies. Each Galaxy has 4 billion stars in it, enough so that each player is given their very own Star System. You always start the game in your home Star System, but can travel to other Star Systems. The Hub, and the Wormhole to Your Personal Star System At the center of the Galaxy is The Hub. This is a hyper-massive black hole. It strains the fabric of the universe so much that it has formed wormholes between it and each of the stars in the galaxy.
You use these wormholes to travel between stars. But they are capricious and the wormhole to a particular star may not be open when you want it. (If it closes while you are visiting the star, you are whipped back to your home star due to something for which I do not yet have a metaphorical description.) Each star system is a persistent universe of its own, where you and others can explore, build, and destroy. You can move seemlessly between interstellar flight, atmospheric flight, terrain vehicles, water vehicles, and submarines. The Rocket Club universe has conquered matter, and any object may be 'crystallized' into a dense information matrix, stored in a 'seed crystal' This is convenient, since you can carry a large number of crystals with you. You can also trade crystals with your friends and enemies. Likewise, a crystal may be 'materialized' back into a solid object at your current physical location. But be careful -- once an object is lying around where other people can get at it, it is at risk of being destroyed, lost, or stolen. Back in your pocket, it's safe. Useless, but safe. Your home star system provides several 'safe' areas where you can build cities and space stations without fear of loss, but outside of those areas it is mostly a free-for-all. You might from time to time, materialize a claim beacon. This declares a sphere of space as belonging to your club. Clubs represent sub-factions of larger empires, and there is a dynamic affinity matrix between these factions. That is to say, you have both friends and enemies. The more volume a faction controls, the more powerful it is. You can manufacture new crystals out of raw elements that you mine or buy. You can then sell these crystals to other players, or to NPCs who may offer you scriptable missions from time to time. New crystals are defined by nanoplan files which describe their attributes and the minimum required elements for manufacture. There are inevitable comparisons to be made between Rocket Club and Star Wars Galaxies. However, please understand that the Rocket Club design spec and vaporware screen saver have been online for several years (pre-dating SWG, I mean). I'm conceptually ahead of my time, but slow to implement :) I blame my non-existent budget! |
| WHERE ARE THE
SERVERS? ----------------------------------- Rocket Club is probably different from any other game you have played, in that each player is both a client and a server. Any time your game is running, it is acting as the server for your home star system. At the same time, it is acting as a client, connected to possibly some other star server. (In Solo mode, your client stays connected to your own server, which does not make itself available to other players)
There is also one HUB server, to which all Star Servers report. When your game is running in hub mode, then the wormhole to your star is open for everyone. While there is only one HUB today (only one Galaxy), the game is set up to allow multiple hubs. Perhaps your office tournament wants to run a hub just for your employees for a week. (The way I have it set up right now, you would have the same star system in all Galaxies.. which is a bit odd on the one hand, but sort of cool in general) Please note: The Star Server is BUILT IN. There is no separate program (a la MIX) to be run. Rocket Club is a peer-to-peer game, and does automatic file transfers between players. These transfers are 100% controlled to be within the Rocket Club folder and can never be used to automatically execute code on your PC. So the worst thing someone can do to you over rocket club is fill your disk drive with rocket club textures. However, most of what you'll see in Rocket Club is using assets (models and texture images) made by other players. As such, I cannot guarantee the suitability of such images. Hence, Rocket Club is for adult players only. Having said that, I insist people use common sense to keep the Galaxy kid-friendly, and I reserve the right to suspend play (or not) for any reason I see fit. I will also fill RC with self-censoring features to let you have some control over what you see. |
| HOW DO I INSTALL
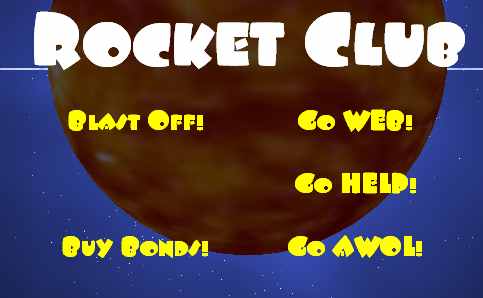
ROCKET CLUB? ----------------------------------- Pretty much as you might expect:
Then you run the game by double-clicking the shortcut. It will bring up the world's most exciting menu, from which you select BLAST OFF! |
| WHAT ARE THE
MINIMUM REQUIREMENTS TO PLAY? ----------------------------------- Rocket Club wants to display an infinite number of cool looking 3D objects on your screen, so the more powerful a computer and 3D display care you have, the better. But here is what you absolutely MUST have:
So, your computer not up to snuff? Not to worry, it will be years before Rocket Club is super fun, and by then you'll have a good enough computer. In the meantime, feel free to give it a lookover. Just don't expect a good frame rate. |
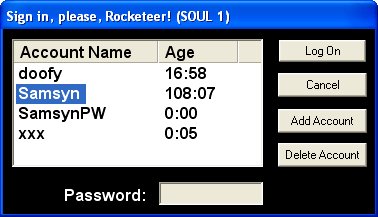
| CREATING AN ACCOUNT ----------------------------------- Each time you BLAST OFF, you will be asked to pick an account to use. You may have several accounts. Each account gets its own Star System. If you use up all your accounts, you will have to delete one before you can make another. So remember, your account is YOU (your player avatar) *and* your star system (owned by that player). Your account may optionally include a password, if you don't trust the other people in your household... But if you forget your password, I am afraid there is no way for it to be resurrected. Don't bother asking ME for your password. Your little brother CAN delete your account, even if it is password-protected, so you still have to be nice to him. All Account files and star system information is held on your computer. If you need to move to another computer, you will definitely need to copy all sixty three gazillion gigbytes of the RocketClub folder to the new PC. Even then you might end up with a new Serial Number. We'll cross that bridge when we come to it. Right now, in fact, your accounts will likely get destroyed with each new release, since I am making incompatible changes at this point. Eventually I will start making an effort to upgrade accounts forward from one release to the next. Again, all data is stored ON YOUR PC, not on a master server somewhere. Backup your Rocket Club folder, if that worries you. You can use your Golden Soul Activation Code (herein referred to as a GOLDEN STAR, of course) in Rocket Club. But there is really no advantage in doing so. Other than to be nice to me, of course. However, your serial number is used to identify any assets you create. So if you add new models or textures to the RC universe, then they will all have your serial number in them. This is to Honor You. Take what you can get :-) This does not prevent people from copying the actual images, of course. They are just files. Try not to let it drive you to distraction. |
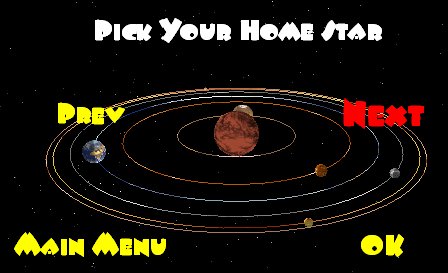
| PICKING MY STAR
SYSTEM ----------------------------------- After creating your account, you next need to pick your account's home star system. Be careful, since you only get one chance to do this (well, you can delete the account then recreate it I suppose).
However, the good news is that all Star Systems are given the same raw materials to work with (just distributed differently) so you are really just picking a star color you like and the layout of planets which appeals to you. You just click the NEXT/PREV buttons until you see a system you like. Take your time. Enjoy the screen. Seriously, I insist you do. I spent many hours on this screen and you will never see it again, so please admire it as long as possible. Use the arrow keys to change the view angles, if you like. Mouse wheel to zoom in/out. After picking your Star System, you will define your character. |
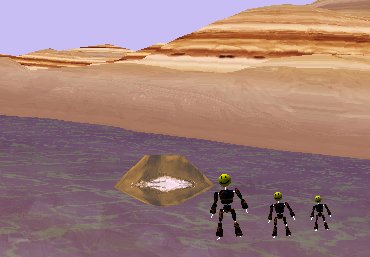
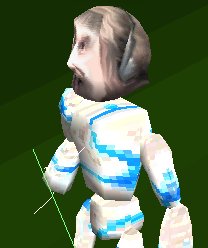
| PICKING MY CHARACTER ----------------------------------- Eventually, this is where you will define your empire, species, faction, starting abilities and basic appearance.
But for now, everyone looks like my stikfa biped. |
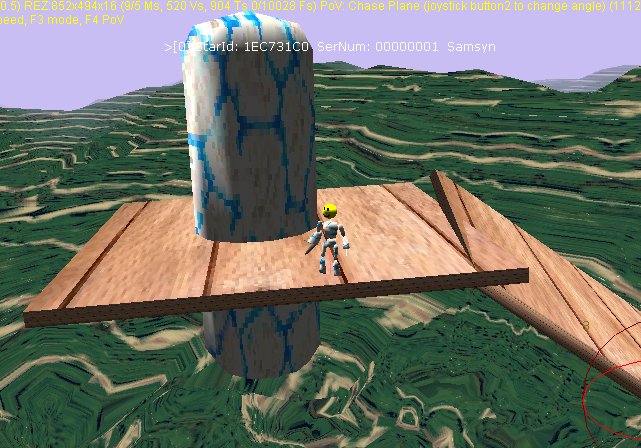
| STEERING MY
CHARACTER ----------------------------------- Your character currently starts off floating in space, near your home star, unequipped. Use the arrow keys, joystick (or gamepad eventually), to turn your character to face different directions. While in space or flight, you have 3 axes of freedom:
When you're walking/driving on the ground, only the YAW controls work. When not in chat mode, the WASD keys will also work as arrow keys. Your Point of View starts off with the camera in 'chase plane' mode. The camera is directly behind you, looking in the same direction as you, so you see the back of your own head. The F4 key toggles you through a list of different camera modes, though I imagine the chaseplane is the most fun. [this feature will probably be removed and you will be stuck with the standard view] You can move the chaseplane position by holding down the CTRL key and using the arrows and joystick. Special Mouse Movement The mouse is mainly used to point and click on the screen, but holding the LEFT mouse button down and then moving the mouse will change the camera angle. Holding the RIGHT mouse button down and moving the mouse will turn turn your character (pitch/yaw). Holding BOTH down, while on planet, will move you forward at walking speed. The mouse wheel can be used to zoom in/out. |
| MOVING AROUND ----------------------------------- So far you have just 'pointed' yourself, but you haven't really started moving yet. You have a couple movement options: TRANSLATION This is where you 'slide' left/right, front/back, or up/down. It's useful when micro-positioning things, but not really the way to explore. You do this by holding down the SHIFT key and then using the arrow keys. FLIGHT THis is what you expect. And what will probably change. The PgUp/PgDn keys can be thought of as your gas pedal. Each time you click PgUp, your speed (in the direction you are pointing) goes up a bit. To stop, you have to click PgDn as many times as you clicked PgUp. By clicking PgUp a lot (say, 20 times), you can go VERY fast. Which is how you get between planets. The trick is to slow down before you need to stop, or you will fly right past your target. Also, you can only see things until they get far away. It's possible to get so far from your home star that you can't see it any more. Then you're sort of screwed until you use a wormhole. Note: eventually there will be constraints on your max speed, depending on your current vehicle, but right now it's more fun to be godlike. |
| MOVING
THE CAMERA AROUND ----------------------------------- I already said this, but hold the CTRL key down to make camera changes.
Or hold down the LEFT mouse button (if you have not wired it to a trigged) and move mouse to change camera angle. This works whether your target is you, or, say, something you are in the act of materializing. |
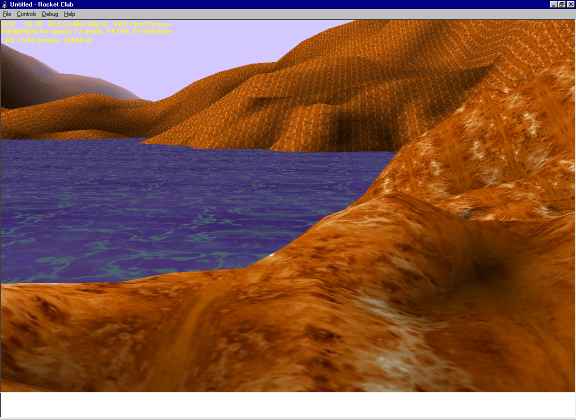
| VISITING PLANETS ----------------------------------- Each Star System has a handful of planets. You fly around to visit them. You can build colonies in orbit (actually just 'near' the planet -- you can build anywhere you like in the star system, even off in the boonies -- good suggestion for making resupply areas in enemy star systems.. but cloak them)
But if you crash your character/vehicle right INTO a planet, you don't explode, you just switch to planetary mode, high in the atmosphere. Pitch down until you see the ground below and head on down. Likewise, you leave a planet by flying straight up. Once you get high enough to see the atmosphere darken, the stars appear, and pop, you're back in interplanetary flight mode. While in planetary mode, you are flying over a fractal terrain and can land (there is gravity on planets) and walk around, build things, mine, blow stuff up, steal stuff, etc. |
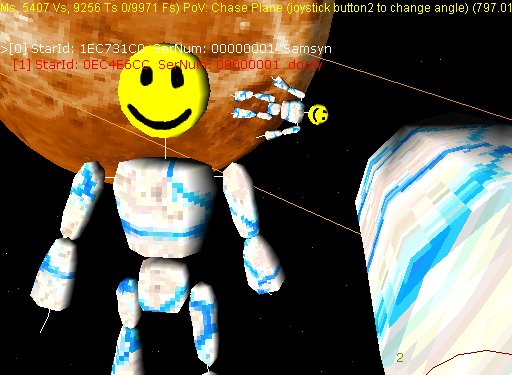
| USING WORMHOLES ----------------------------------- You might spend all your time in a single star system. But if you want any multiplayer action, then at least ONE person will have to use a wormhole and leave their own home star and come visit you on yours (or vice versa). Or a gang of you can all invade the same system and be nasty little rebels. (remember, make your glorious edifices in safe areas, but to advance your empire you will also need to claim un-safe areas, which can then be destroyed) I can't believe we made it this far down the page before I had to mention the CONTROLS menu. There are a million helper dialogs which you currently open via the CONTROLS menu. Eventually I will have beautiful little icons along the bottom of the screen. The WORMHOLE Dialog gives you a list of all the open wormholes (i.e. all the active players online right now in the galaxy). You might notice that each Wormhole has an ID number (Star ID) next to it. Your home star has an ID too.. (in fact, you will see it on this list.) In theory you don't need to know this number (it's different from your player serial number), but it is of some major importance to the game. (whenever a new object is created, it is assigned a unique ID which is formed in part by the StarId of the home star of the person who created it -- not necessarily the Star System it was born into though...) This dialog doesn't offer much yet. Click on a wormhole and click the warp button and you will head off to that star system. The dialog shows how many people are currently visiting each star system. It might take some time to travel through the wormhole (in reality, the star server is downloading any files you need, but METAPHORICALLY, you are travelling through a wormhole!). |
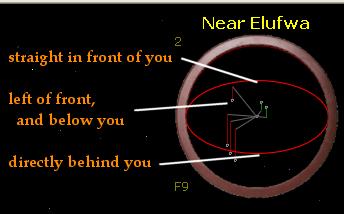
| USING RADAR ----------------------------------- Space is big, stuff is small. Your radar is your friend. The current radar is pretty simple. It has nine range settings (press F9 to change ranges). For each object in range it draws a little glyph inside the radar sphere. Your ship is in the center of the sphere, the glyph is then drawn at the relative 3D location of the object. To help you resolve the image, a horizontal plane cuts the sphere in half. The 'shadow' of the object is then dropped to this plane with either a green line (it is above the plane) or a red line (below the plane). A gray line then connects the shadow to the center. Thus, to reach a particular blip, YAW until its gray line is straight up, then PITCH until its red/green shadow line goes to zero length. At that point, you are aimed straight at the object. Yes, I should let SHIFT-F9 toggle the other way through the ranges. I also plan to add some selector buttons to filter the various glyphs, and make the currently selected target blink or something. Little warpath diamonds represent other players. little white boxes are 'stuff' Pointing at a glyph might show you its name. When in freespace, planet glyphs are shown to help you navigate. |
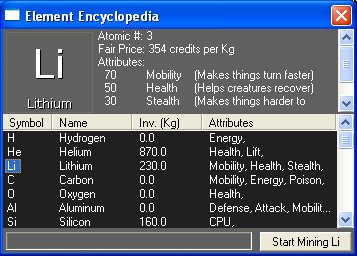
| MINING ELEMENTS ----------------------------------- The Rocket Club universe has 255 elements in it. Atomic numbers 1-127 are rserved for their 'real world' equivalents (in this way RC is educational, teaching you The atomic symbol and weight of many useful elements) The other elements are reserved for 'humorous' elements (like "Killium", "Armorium", and "Strengthium") Each element has multiple attributes like how much it contributes to speed, power, or health restoration. The Element Inventory has a guide built in which will tell you what you need to know about individual elements. Crystals (and hence objects) are made out of elements. So a piece of pizza made with a large amount of Helium will HEAL (get it?) you more than one with less Helium in it. An Individual crystal can contain no more than six (four?) different elements, so as a designer you need to pick the perfect combination of elements for your needs. (why use Killium when you can use Plutonium instead, which has both electrical power AND damage attributes) Each Element then has a 'Fair Market Value' based on its particular combination of attributes. When you sell or buy elements, the FMV is shown and you can decide if you are getting a good price or not (FMV does not include labor, of course). The ELEMENT INVENTORY control panel (from the CONTROLS menu) is sort of your General Purpose Electronic Shovel. You use it to:
Mining is pretty simple still. Just click on the element you want to mine, then press the MINE button. Every few seconds another load will appear in your inventory. You can mine anything anywhere, but the local concentration of the element determines how much you actually get. I have written the code which allocates the element concentrations, but for some reason am not actually using it yet, so for the time being you always get 10Kg. A good deal! Then again, you will lose it all the next time the game is upgraded, so don't put too much heart and soul into mining yet. Some elements can not be mined, but must be transmuted from other elements. (details to be added). |
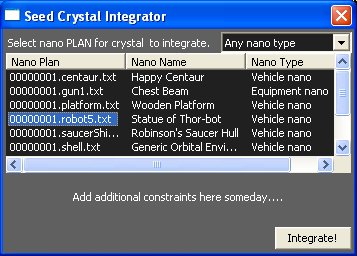
| INTEGRATING CRYSTALS ----------------------------------- So, you have a bunch of elements in your Element Inventory, but you notice you also have a CRYSTAL inventory (and it's empty!) so what do you do about it? Well, you need to assemble some of those elements into useful crystals. You use your CRYSTAL INTEGRATOR for that (another CONTROL MENU option). This consist of:
Voila, a few seconds later you have a new crystal in your CRYSTAL INVENTORY (a separate, but equally-named, CONTROL MENU option) DISINTEGRATION You might decide you don't want a crystal anymore. Well, just select it in your CRYSTAL INVENTORY and then opt to disintegrate it. You will then get back the raw elements used to create it. Or some of them, at least, depending on your disintegration skills |
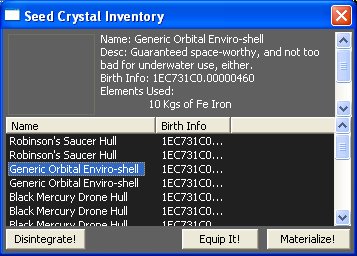
| MATERIALIZING
CRYSTALS ----------------------------------- A crystal in your pocket is all fine and well, but you need to bring it out into the world before it does you much good. This is called Materialization (and I am obscenely proud of this metaphor). Just select it in your CRYSTAL INVENTORY, then press MATERIALIZE and it will appear some distance in front of you. At this point it is still caught in your materialization beam. You can thus 'steer' the object around using the same movement and camera controls which usually pilot your own character. When you have it where you want it, press ENTER and control returns to your character. Alternatively press ESCAPE to abort the materialization and return the crystal to your pocket. Note that after materializing an object, it is NO LONGER IN YOUR INVENTORY. Hence if you forget where you left it, or are unable to return there, it is gone. CRYSTALLIZATION The opposite of materialization is crystallization. A materialized object will have a crystal handle on it when you are close enough. Click on this handle to get a menu of possible things you can do with that object, one of which is to crystalize it, at which point it is removed from the universe and returned to your inventory. |
| EQUIPPING CRYSTALS ----------------------------------- Another form of materialization, where a crystal is manifest into the world as a physical object, but in this case that object is glued to some other object. First off, not all crystals are EQUIPMENT crystals, and only EQUIPMENT can be equipped. Each piece of equipment has a defined "bone name" to which it can be attached. (it's defined in the nano plan file used to make the crystal) Your character, vehicles and other objects have 'skeletons' made up of 'bones' with names like "hand0" (right hand), "foot1" (left foot), "foot3" (left rear foot), "foot5" (left rearmost of 6 legged animal), etc. (Note: your character CAN have two, or more, left feet!) While most bones related to an obvious feature (head, engine, door, etc.) some exist merely as attachment points for equipment. But the cool thing is that ANY bone can be used as an equipment attachment point (though only 'saddle' equipment can be hooked to a 'saddle' bone, for example) SO you can have a gun that mounts on a vehicle, an add-on engine package, a pair of wings that works on you or your horse, etc.) ANYWAY, The way you equip something is to select it in your CRYSTAL INVENTORY and push the EQUIP button. If there is more than one choice (a "hand" equipment can be used in any hand, while a "hand0" equipment can only be used in the right front-most hand) An Equipped crystal still appears in your inventory. If you want to equip a vehicle, you must first be driving the vehicle, then the EQUIP button applies to the vehicle and not you. UNEQUIP Um, no UI for that yet, sorry. I also have to wire in the triggers so that you can intelligently manipulate one of your several pieces of equipment (fire weapon 3, turn off shield 2, etc.) |
| HOW TO CHAT ----------------------------------- There is currently a form of global chat. Click in the main window (i.e. get focus off of any dialog box) and type ENTER to get a chat prompt. Then type a line of chat and hit ENTER again. This goes to everyone in the galaxy (obviously a problem in the long run, so expect this to change) and appears in the main screen briefly. But mostly you will probably chat via an IM window. Open the PLAYER LIST from the CONTROLS menu, double-click on a player name and an IM window opens. This is a conventional text chat window, with the following extra features:
Like all my games, RC is really a thinly disguised excuse to chat. |
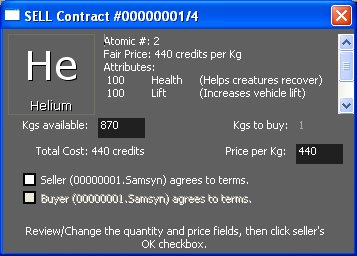
| TRADE CONTRACTS ----------------------------------- There is an option in the CONTROLS menu to open a contract page. Do NOT use that. It's just to help me develop. The CORRECT way to start a contract is to right-click on an item in your CRYSTAL INVENTORY or in your ELEMENT INVENTORY. You will then see a menu of everyone to whom you have an open IM (or any NPCs willing to buy stuff), and can opt to open a contract with them. You see the Contract window open first, with the product defined. You can modify the quantity you are offering for sale, and the price you would like to get. When you like your offer, you click the SELLER AGREES checkbox. This locks the contract (you cannot change it), and then it is up to the BUYER to review the offer. The Buyer may change the price or quantity (to less), and then presses the BUYER AGREES checkbox, which locks the contract again, but removes the SELLER AGREES checkbox (any change does that). Anyway, you do this back and forth for awhile until there comes a point where you are both in agreement. At that time the buyer can commit the exchange (or abort it) and money and goods change hands. Eventually, the HUB will sell items on consignment for you. You basically give them to the hub (they are gone from your inventory), and later the HUB gives you money. |
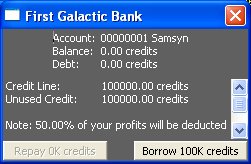
| THE BANK,
BORROWING MONEY ----------------------------------- You pretty much need some cash to get started, so the Bank (CONTROLS menu option) is how you borrow some. You have a line of credit, based on your assets, which sets your maximum indebtedness. You can repay at any time. While you are in debt, however, some portion of your income from sales (from your profit) goes to the bank to pay off the loan balance. |
| CHAT MACROS ----------------------------------- The MACROS control panel lets you create typing shortcuts. You can also create them on the fly by typing SLASH <macroName> <SPACE> <text of macro> ENTER Once defined you can then cause the macro to be emitted by typing: <SLASH> <macroName> ENTER. |
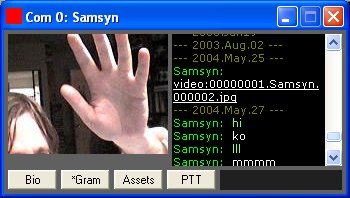
| VIDEO CHAT ----------------------------------- If you have a camera attached to your computer, then you can open the CAMERA window (from the CONTROLS menu) which gives you a preview of what your camera is seeing. When you press the SEND button, a snapshot is taken and then sent to all your open comm windows. It then appears in player's IM windows both as a graphic, and as a text 'url' in the chat area. People can review old images (weeks later, even) by clicking on those urls. If you resize the IM window, you will notice that it actually shows the 'last N images' viewed. |
| PLAYER DIARY ----------------------------------- Each time you encounter a new player in the game, a page is added to your Diary with information about that player. You can use this diary to write private notes, access old conversation logs, or view images sent from that player. You can also give them a 'buddy hat' a la WoS. Please note the scroll bar on the name list. This allows you to sort by name or player serial number. |
| SKILL SYSTEM ----------------------------------- content |
| CLUBS, FACTIONS,
AND EMPIRES ----------------------------------- content |
| OPTIONS ----------------------------------- content |
| GOLDEN STARS ----------------------------------- For now (and I do not anticipate changing this, but I am hedging my bets at this time), your regular Golden Soul activation code will also work with Rocket Club.. Same code, but a different name. Still a 'GS' but here that means "Golden Star" Presently, there is absolutely ZERO advantage to you in having a Golden Star. No donation is required to play the game. Yes, if I can see a way to charge you a penny an hour to play this game, I would probably jump at the chance. But I don't see any viable way of doing that... yet. If you feel like making a voluntary donation, however, I will cheerfully accept your money here. |
| DEBUG MENU ----------------------------------- Presently, there is still a DEBUG menu option with a large number of entries on it. Most of these will shoot you in the foot, if you are trying to play multiplayer. And maybe I don't feel up to documenting them all at this time. Some of the more important ones are:
|
 |
| BE A ROCKET CLUB
DEVELOPER! ----------------------------------- Much of the game consists of trading objects between players. And YOU can add new objects to the game! That makes you a DEVELOPER! To be clear, if a 'green chair' object already exists, you don't have to be a developer in order to integrate a couple our of raw elements, materialize them on some planet, and then blow them up. You just need to be a developer to add a brand new KIND of thing to the world... like.. a red chair. Ultimately, you will be able to design:
Things which I currently think you will NOT be the designer of
Being a 3D game, a 'new thing' generally consists of the following pieces:
|
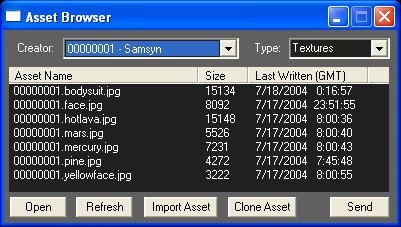
| ASSET MANAGEMENT ----------------------------------- Models and Textures are both examples of 'assets' and always have a 'creator' (the person who drew them, created them. The artist. The designer. You!) A single object may be composed of a handful of individual assets, but each asset is exactly one file on your disk drive. You create your assets using tools not included in the game itself. (I recommend MilkShape for models, and PaintShop Pro for 2D graphics). You keep your original files around in your own special folder, outside the game, which you regularly backup. Only copies of those files end up going into the game, and those copies are not direct copies, but special compressed copies, so that the assets can be efficiently shared with other players (also so your 3D accelerator card memory is used efficiently) After creating your new model or texture, you must IMPORT it into the game by using the ASSET BROWSER in the game itself (you can do this in SOLO mode, or you can collaborate with other artists by doing it on line... The Asset Browser lets you send copies of asset files manually, just like you send video images.) If you resize this window, you will see that it has a previewer panel on the far right. Note that each asset names starts with an 8 digit number. That's the PLAYER SERIAL NUMBER of the player who created the asset (00000001 means it came from ME, which might or might not mean I actually drew it.... just that it probably came standard with the game) When you add assets to the Rocket Club universe, you are giving all your fellow rocketeers the right to re-use your work within the context of Rocket Club (but not outside that context). If you can't live with that, then don't add assets to Rocket Club :-) |
| FILE SYSTEM LAYOUT ----------------------------------- If you rummage around inside of your installed copy of Rocket Club, you will see that it has a lot of sub-folders. The two most important folders in this context are:
The ASSETS folder has within it, more folders! It has one folder per designer! So if you create any new assets, you put them in your very own subfolder, based on your player serial number. For example, let's say you create both a model and a texture, and then import them. And that your serial number is 12345678. Those files will end up in the following locations:
Note that your serial number is used both as a folder name, AND as a prefix on the filename itself. This is just so that we remember who made each individual file, even if they get dragged to some other folder temporarily. However, you should NEVER have a 12345678 asset in a subfolder of some other player's serial number. If you aren't changing the file, just leave it alone and where you found it. We don't want people to have to keep multiple copies of files around. The HUB folder probably doesn't need to much explanation, since you should never be fiddling with these files manually. But I know all the curious hackers need to know this stuff anyway! Inside the HUB folder is a subfolder for each HUB (Galaxy) you have played in. For the foreseeable future, that is just hub 0 -- mine. Inside the hub 0 folder is a subfolder for each STAR you have visited in that galaxy. This starts out just knowing about your own home star, but gets bigger after you start warping around the galaxy. Please understand that each star has its own STAR ID. The Star ID of yuor Home Star is NOT the same as your Player Serial Number. (for one thing, each of your accounts gets its own StarId, but they all share the same Player Serial Number.) If you get a Golden Star, by the way, that becomes your new Player Serial Number. (which means assets you make after that point will end up in a new assets folder, but that's OK.) Inside of an individual star's folder, are files for each of the objects which were 'integrated by the owner of that star system.' This is probably confusing, so I will let you think about it for a moment. As a DESIGNER, you will recall, you create brand new ASSETS (models, textures, and plans) which get tagged with your player serial number and stored in the related ASSETS folder. That is for your glory. But when someone just MAKES one of the things that you DESIGN (they integrate it out of raw elements, following your plan file), well, that's different. That's just an INSTANCE of the object which you designed. There might be 50 billion red chairs made. By 20 billion different people. Each individual red chair needs a unique id so we can tell which one of them we just sat in, or blew up. So, when YOU make a red chair, I give it a unique name based on your HOME STAR ID and an index number which basically increments each time you make something. I could have used your player serial number instead of your home star ID, but I wanted to remember this separately for each of your accounts. (each account gets its own star id, remember?) Isn't that great? So, an INSTANCE ID of 3e45f332.37 is "the 37th thing ever made by the account whose home star id is 3e45f332. And since that object is defined by a file, and that file has to go somewhere, I stick it in your home star's HUB folder. So that red chair ends up being a file with this name:
I pad the zeroes, and I implied 37 was a decimal number, when really it is hexadecimal, but you get the idea. So, now that you know how the directory is laid out, try not to ever touch it directly. I will provide tools (like the IMPORT command) to let you get things added correctly. I don't want you having to type the star ids correctly. Note: you are only the AUTHORITY over files in YOUR folders. So you can't hijack someone elses asset and deliver it under their name (well, you can, but not permanently so). For example, if you have a copy of the asset I need, even though it came from a 3rd party, I will accept your copy. But if I later run into that third party, I will get the 'official' version from them. |
| MAKING MILKSHAPE
MODELS ----------------------------------- You don't HAVE to use MilkShape, you just have to come up with a file of exactly the right format. And trust me, MilkShape is the easiest way of doing that. However, I strongly urge you to run out and get MilkShape if you are at all interested in being a 3D modeller and are an honest person like me who would never consider using a warez copy of 3D Studio Max. I'm serious. I don't feel it is right to use warez. I've heard all the explanations pro and con and I leave it to the individual to decide what's right for themselves. But my reaction to the argument that "3D Studio Max and PhotoShop are overpriced!" is "Yes they are, so use cheaper tools which do basically the same thing" And MilkShape does everything I need a modelling program to do, for a lot less money than 3D Studio Max. It's not COMPLETELY free. You get 30 days or so (don't install it until just before you need it, and watch the cool tutorial movies first) and then you really HAVE to buy it. I forget how much it costs... $25 or so. It's worth it. If I were really nice, and could prove it, I would give you a free GS if you paid for MS. (Of course, I would simply lose money on the deal, so I would never actually do that. But it's a nice thought.) That being said, making models is a bit like making a world for Well of Souls. It's harder than it first seems it should be. Especially when your model starts to get a bit complicated. It can be hard to grab onto just the vertex you want (hint: use the cool 'hide mesh' feature) What Mete did (author of MS, and someone who I feel a high degree of kindred spiritedness with) was integrate an AVI file maker into MS itself. Yes, MS can make 'movies' which you can then play back with media player. You might think: Oh, well he did this so that I could make a movie of my model spinning around, or going through its animation paces... and yeah.. sure.. you could do that. But what you can REALLY use it for is to MAKE TUTORIALS. So you just start recording, then talk into the microphone and describe what you're doing. The video is then the MS program, complete with mouse cursor and menus popping up as you perform the tasks you are training someone to do. As a result, it is so easy to make tutorials, that there are a ton of tutorials! And some (not all) are really good. Plus, since they are just AVI files, you can download and watch them before you install MilkShape. So, I'm not prepared to walk you through the creation of a model here, and there ARE some Rocket Club specifics (for example bones and animations) which you need to know about it. But also some of that is still being cast in stone so anything I say here now might change. OVERVIEW:
It's OK for your head to hurt a little bit at this point. Especially when you start to realize that the shape of the triangle itself doesn't have to be the same in 3space as in 2space. You might have a perfect little isolateral triangle in 3space mapped onto a skinny little wedge of the texture, since that's where the eyeball got drawn on the cookie dough. Of course, if they are NOT the same shape, then there will be some smooshing of the image as seen in the 3D world. but sometimes you have to Smoosh it for it to look normal. HOW A 3D DISPLAY CARD WORKS Here is a really simplified view of how your model magically gets drawn on the screen. In the context of MilkShape there is exactly one texture image per mesh, and I will imply that here.
And there you go. You need know nothing more. Go out and be dangerous! Please note that the above may be riddled with errors and oversimplifications. Just take solace in the fact that you don't really have to know any of that. You just have to make your models and textures. STEPS TO MAKING A MODEL
RocketClub Asset File Names CAN ONLY USE ENGLISH LETTERS AND NUMBERS. If you use something 'goofy' like "1337{<<freek>>}" it will not be usable in RocketClub. Now, to add one of your files to the game:
Bango Bingo, Rocket club will add your serial number to the file name, and copy the file to your rocket club asset folder, as in:
Congratulations, you have added a model asset! |
| MAKING MATERIALS/TEXTURES ----------------------------------- I tend to use material and texture to mean the same thing, when they really are not. The texture is just the 2D image that you drew with your paint program. A material is both a texture image AND some extra data about it. This extra data is defined inside of milkshape as part of the material definition you had to make to bind a material to a mesh. The extra data describes how the texture will reflect light (or maybe even that it glows, is transparent, etc.) There are different KINDs of light in the 3D world (diffuse, ambient, specular, and um.. the other one). Diffuse is the 'normal' kind. ambient is pretty normal but represents light that is just bouncing around from all directions, as opposed to coming from a directional light source. Specular is for things like 'glints' and shiny spots. Basically you specify how your material reacts to each kind of light. So a scene might have lots of ambient light in it, but you made your brownie model using a material which doesn't reflect ambient light. So it doesn't show up (well, it is black), while the plate you made is set to brightly reflect ambient light, so it does. I'm not sure how close to reality this is, but it's how 3D cards are set up, so we can assume it has practical uses (and/or it was just the easiest math to do) The person who made the model already defined these material properties for you, though you can override them in you PLAN file later. Hopefully they also gave you an example texture file which works with that model. Note: a model might have several texture files associated with it, as many as one per mesh in the model. Or it might only have one with all the meshes being laid out on the same texture. In that case you need some sort of guide to tell you that the FOOT texture needs to be drawn in the lower left corner of the picture, and the EYEBALL image in the upper right, but sort of on its side.. etc. I hear this gets easier with practice, and that there is some skill and artistry in deciding how to lay these things out. I'm not that good with it yet myself.
At this point, you have crafted a huge fat and beautiful texture image. But rocket club has no idea that it exists. If you subsequently edit the master copy, you will need to repeat the following to get the new version into RC.
Congratulations texture designer, you have added a new texture to the rocket club universe. You will find it in this file:
Unless you have a nicer paint program than I do, you probably can't actually look at the dds file yourself. But it should work in the game just fine. DDS is a lossy compression algorithm so you wouldn't want to edit it directly anyway. Now some of you are thinking 'cool! I can add images which people cannot copy!" and while that is practically true, it is wrong-think all the same. When you add an asset to the RocketClub universe, you are giving everyone free right to re-use your work, within the context of rocket club. That's just the way it is. |
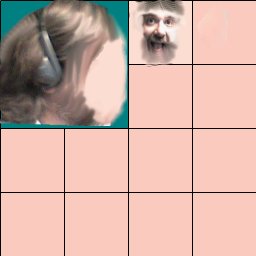
| MAKING 'FACE' AND
'HEAD' TEXTURES ----------------------------------- Models which are intended to be used for player characters should include a couple special meshes, named 'head' and 'face.' You can look in an existing file to see what I mean, but basically it works like this. Imagine the character has a head which is a sphere, and the front bit of the sphere (about a quarter of the total sphere area) on the front is called the face. You would then break the sphere into two separate meshes, called 'face' and 'head' (head being the entire sphere MINUS the 'face' mesh). You have to use these special names, since the code will treat those meshes in a special way. The texture image that you apply to these meshes is assumed to be a square, divided into pieces, like this: file: rc\assets\12345678\textures\12345678.creepyFace.dds The big chunk in the upper left is the texture which will be applied to the 'head' mesh. The image should be a side view of the head, and will be mirrored on both the left and right sides of the head. It should have a blank 'flesh' color where the face would go. Each of the little chunks is a separate image of just the face (colors should match to make it smooth.) Each little face will convey a different emotion, mood or state. User's will be able to pick their mood, which is then reflected in the 3D world, but also moods will be chosen automatically for game-related reasons (you get hurt, you eat some pizza, you speak, whatever. Just like Arcadia :-) When these things get glued together, you get something that looks like this: Only I hope yours looks even better :-) Note that the 'geometry' of the head and face come from the model, not the texture image. So I have pulled out a bit of a nose in the geometry and then made it line up somewhat with the texture. The model is also where you define the 'mapping' of the geometry to the texture, so unless you made the model, you are stuck with the job of sliding your texture around until it lines up. Note that for a texture to look good when wrapped on a 3D model, it doesn't necessarily look good as a 2D texture image. It might look all stretched out in 2D, when it looks great in 3D. |
| MAKING NEW NANO
PLAN FILES ----------------------------------- For now, this is a manual operation. Eventually I will make a tool for this. For information on the file format, check out the comments in this file:
Or if that doesn't work, rummage around in the 00000001 plans in general. |
| WHAT PORTS DOES
ROCKET CLUB USE? ----------------------------------- This is easy. As of this writing, Rocket Club uses port 21000. The Hub uses port 20999. Rocket Club may use TCP or UDP on these ports. You will definitely need to open 21000 through your firewall for both TCP and UDP, and forward it through your router, if you have one. You will get both incoming and outgoing connections on these ports. Chances are you won't need to do anything special for 20999, but if I am wrong, well, just do the same thing that you did for 21000. If you run two copies of RC at once... well.. you won't have control over the other ports. Don't do that. It's crossing the streams. Also, RC hopes to use port 21001 as a sort of mini-web-server for your star system, such that someone with your IP address and that port number could open the page with their browser and see.. I dunno what. Something like your tournament/usage stats, a message from you, something. It could be really cool. |
| WHAT
SCRIPTING LANGUAGE DOES ROCKET CLUB USE? ----------------------------------- Many objects are/will be scriptable in rocket club, using the rocket club API (which I am not prepared to document at this time, being still in flux). But basically this is how you will add 'quests' to your star system, and embue objects with 'behaviour'. It will also be an important aspect of how the buttons work. Anyway, like most games (except WoS, of course), RC uses lua. You can hone your lua scripting chops with TurnAbout in the meantime. Like the TurnAbout API, the Rocket Club API is sufficiently neutered so as to be incapable of causing any mischief outside of your Rocket Club folders. But algorithmically it is very powerful (so powerful that RC imposes some resource limitations so that your script can't go insane and lock up the game in some infinite loop -- or so I hope!) |
| TITLE ----------------------------------- Body |