| Synthetic Reality Well of Souls |
| Custom Skins |
Home Page
Download It!
Donate
Community:
Guild Hall
About Guilds
WoS Ladders
Bulletin Board
Hall of Heroes
Josh
Developers:
Custom Skins
Other Worlds
Author's_Guidelines
Art_Submission
Cheat Codes
Beta Testers Page
Development_Notes
| What
Are They? One of the fun things you can do in Well Of Souls, is design your own skin. Your skin is what other people see when you are walking around inside the game.
Plus, the game will automatically share skin files with other players as you encounter them (unless you disable the option). So, over time, you will build up quite a library of skins to choose from. |
|||||||||||
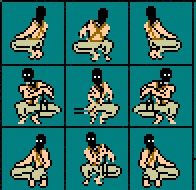
Skin Layout A skin file can be thought of as a film strip of six 'cells,' where each cell is used for a different purpose. Each cell is a square (and the 'height' of the overall bitmap sets the width of each square in the filmstrip). You can have squares of any size (within reason), but you probably want to use heights which are an even multiple of six pixels. For your convenience, a selection of empty skin files of varying sizes is available in this ZIP file. Note the black guidelines within the image. These must be placed exactly correctly (so that they get filtered out before the image is drawn in the game). This is an excellent reason to start your skin using one of the blank templates.
The four middle frames are used when your character is in a 'scene' and depict a side view of your character, posed as if fighting a monster on the left side of the screen. The four states of your character are, from left to right:
Always draw your hero acting as if the monster is on the left of the screen. The game will automatically 'flip' the image as necessary when the monster is actually on the right. Note that in these four frames there is a special area just below your character (one sixth of the total height of the cell). This is where you draw your shadow. Characters are generally drawn as 'floating' over their shadows. NEW TO WOS A62 - MAGIC ATTACK FRAME A recent change has enabled an optional seventh frame. If you extend your filmstrip file one more frame to the right of the credits frame, then that new frame will be used during a MAGICAL ATTACK (the old ATTACK frame will only be used during a PHYSICAL attack) The full order of frames supported is now:
Have fun! |
|||||||||||
Transparency, Palettes and File Size: Because your skin file will be shared with other players, you should make an effort to keep your skin as small as possible (measured in bytes of file size). A typical skin should be 15K to 20K bytes in size. If your skin is much larger than this, it is probably because it is a 24 bit RGB bitmap. You need to change it to a so-called "RLE format bitmap file", using only the official 256 colors found in the game's palette file. If you don't, the game may refuse to share your skin with other players. You might find the WoS Viewer tool to be helpful in checking your skin for alignment, as well as forcing it to use the proper palette and compression.
If you don't know how to turn your file into an RLE format file, you should get a copy of PaintShop Pro (an excellent paint program). You can get a free demo version from http://www.jasc.com/products/psp From inside of PaintShop Pro, do this:
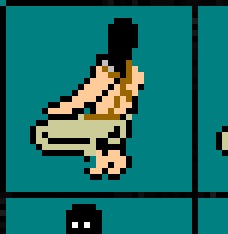
NOTE: The Newest Version of Wos Viewer now supports palette conversion and compression! Secret Trick: You know that upper left pixel which defines the transparency color? If you also set the bit just to the right of it to the same color, then your character will not float. It will sort of 'glide along the ground.' For this reason you'll really want to keep the top row of pixels set to the guideline color as shown in this example. Now go out there and be creative! But some things to avoid might be:
|