
Copyright 1998-2014 (c) Synthetic Reality Co.
Synthetic Reality: |
| Home Company Store Donations Contact Us |
Games: |
| Well of Souls Arcadia: > Empyrion > synChess > synJet > synPool Warpath 97 Warpath Classic NetSpades MIX Game Server |
Demos: |
| Rocket Club synVertigo synWater synBirds synVista Galaxy Simulator |
Community: |
| Forum About Us FAQ News CASH-CAM Friends |
Money: |
| Donations |
Anyway, never one to simply be satisfied with the beauty of reality, and suffering from computer withdrawal symptoms, I spent a lot of time thinking about how I would write a program to capture a small portion of that beauty. Of course, I have the usual Big Plans (tm) about developing this into a game engine for some future shareware project (so, all rights are reserved, of course), but I recognize it is not ready for prime time yet.
As I write this, the program has about 12 hours of development time invested in it (not counting notes I made in the car), so it is a very young program. I am obscenely and smugly self-satisfied with how quickly I was able to create something actually similar to my vision, though hopelessly inadequate in the long run. On my PII 300, it achieves 18 frames per second with a 300 pixel wide window. That is to say, it isn't a speedy program and it probably pokes along on a 486.
This program is FREE, not shareware. Just enjoy it.
What Is synVista?
Basically, it is a ray-tracing program displaying a fractally generated landscape, in real-time. At least, that's what I tell myself. You can manually navigate across the surface by pressing the poor man's excuse for buttons (this is just an engine test-frame, so I just made some bitmaps and sense clicks in them. I thought it was pretty clever at the time...)
If I continue work with the engine, I plan to make a simple sail-boat/recreational area simulator. (who said Synthetic Reality knew how to keep a secret?)
This also introduces what I hope to be a successful naming convention (i.e. adding "syn" to the front of every new product name). I can't tell you how excited that made me! (my wife came up with the name. Isn't she great!?)
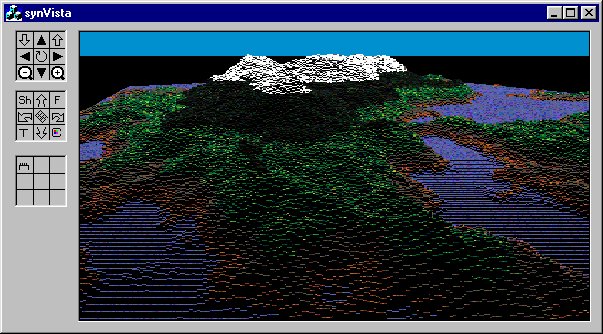
Here is a life-size screen shot of synVista in action:
(I am imitating my Galaxy Simulator notes here, in case you noticed the mindless duplication of format). My goal with synVista was to:
- Write my first ray-tracing program. Now that OpenGL, Direct3D and hardware 3D accelerators are endemic, I thought it was appropriate for me to take my usual step back into the past and do it all from scratch, ignoring the tools easily available to programmers in my day and age. synVista is 100% raw software (and it shows!)
- Capture the beauty of Oregon (my excuse for saying things like "I was looking to achieve a 'painterly' effect, as opposed to simply a photo-realistic effect. And I wanted to capture the illusion of millions of trees" when really I just hacked out all I was able to do.)
- Write another program with an insane number of computations per second to enjoy my shiny PII 300, even when my friends are now getting 450MHz machines and trying to depress me. Intel should give me an award for slowing down computers better than anyone else!
Running the Program
Well, just unzip the executable and run it. This should unzip to be a folder with two files in it. You need the souls.pal file to be in the same folder with the synVista.exe file (which is what you run)
| synVista version 0.1 | synVista.zip |
It is a dialog-based MFC app written in VC++ 4.2b Right away it starts displaying a fractal landscape, which runs in real time on my machine. You can resize the display to your comfort and experiment with the controls along the left. The controls are placed in three image maps of nine buttons each. Roughly the top map is for translation, the middle map for rotation, and the bottom map for room to grow.
Here is a description of the buttons, roughly in order (see screen shot above)
Top image map:
- down arrow. Step down in altitude (it's percentage based)
- foward arrow. Step a little bit forward along the Y axis (will make less sense after you rotate)
- up arrow. Step up a little in altitude
- left arrow. move a little to the left along the X axis (again, world-coordinates, so it will make no sense once you have rotated a bit)
- ORBIT. Push this button first! It toggles the flyover mode which makes you zoom around over the map for maximum 3D enjoyment. You are actually following a 7/5 lissajous curve which makes it interesting, but controllable. Fiddle with the altitude, pitch, and yaw for maximum enjoyment.
- right arrow. move a little to the right along the X axis (blah blah.. makes no sense.. blah blah)
- minus magnifying glass. Zoom out. (count your presses, there is no easy way back to neutral)
- back arrow. Moves you backwards a little along the Y axis (senseless... axis... blah...)
- plus magnifying glass. Zoom In. (get a close up on the math!)
Middle Image Map:
- SH - Shader button. This steps through the available shaders. Only two for now. The one in the image above is the 'no shading' which I think gives the coolest overall effect of 3D. The other mode is a sort of 'vertical paintbrush' shader which definitely enhances the sense of 'tree-ness'
- Pitch Down Arrow. Lower the nose of your 'ship' (or maybe this is pitch up)
- F - Filter button. This does a 9-square smoothing of the current fractal world. I put it in when my fratcal world generator was creating nearly random noise. BUt it's interesting to smooth the world and see what happens.
- Yaw Left Arrow. Rotate a little to the left (10 degrees)
- Create New Map. Push this button (it's in the center of this image map) to create a whole new fractal world beneath you. They tend to be either a bunch of little islands, or a monster mountain. It's all random. Click till you see one you like.
- Yaw Right button. Rotate your ship a little to the right (10 degrees)
- T - terrain following button. This forces your altitude to be just above the surface. If you are orbiting at the same time, it also slows down your velocity, to give more of an illusion of walking over the surface. synVista isn't done until a person walking on the surface gets an attractive view (instead of the closeup rectangles you see now)
- pitch up button. raise the nose of your ship a little (or is it down?)
- C - Color set selection. This button toggles you between the available color palettes. Three of them are more or less random (stepping through the palette based on row, column, or altitude of the fractal database) while the 4th one (the default, pictured above) uses a texture-mapper to pick colors from several texture maps (water, sand, dirt, meadow, conifers, and snow)
Bottom Image Map:
- Hairy Button. This toggles the 'subfractalizer' on. This isn't completely working yet. Basically it recursively generates additional levels of fractal detail when you get closer to a spot on the map.
I spent a total of 30 seconds drawing the buttons, so please forgive the lack of style.
The Math
I pretty much made up everything here. synVista is NOT a mathematically accurate simulation. It is an attempt at rendering 'something pretty' in real time. BUt I did give myself the constraints of viewing a real world which can be created manually (though I am just using a random fractal map for now.
Creating a Fractal Landscape:
- I did this once before in my life (on a 386) and the funny things are: 1.) I made the same darn mistake which took me four hours to figure out (again!), and 2.) computers have gotten a LOT faster. So fast that you hardly have to be clever at all to make them do impressive things! (luckily for me!)
- What I did is to start with a two-dimensional array of 'cells', where basically a cell just contains an altitude. After some weaseling, I decided I would say my world-units (for example, positions in space have X, Y, Z coordinates which are each 32 bit integers) would be centimeters. And my fractal landscape database would have actual data points on ONE METER steps. (woo hoo, that's a lot of data!). I then twisted reality and decided to claim there were 128 centimeters in a meter (powers of two are the name of the game in computer-town).
- The version of synVista you see is actually only modeling a universe of 512 meters along a side. My design goal is a 4 kilometer square containing a set of islands in the middle of an infinite ocean. I can add additional island groups at other locations, as I see fit.
- So, job one is to populate the altitude of each cell with something approximating a fractal surface. I did this using a recursive algorithm (which I imagine is the only way it is done). My ultimate goal is to have an editor so you can lay in roads, bridges, airports, etc. Imagine starting with a square, the size of your entire world database. It has four corners, in my case at points (0,0), (0,511), (511,0), and (511,511). Each whole integer between 0 and 511 is an index into this 2 dimensional table of cells.
- The altitude of these four corner points (their Z component, if you will) is zero. (Since that represents sea level in my world and I want the islands to merge into the ocean)
- Now, we call a function, which later on is going to call itself (recurse), passing it the coordinates of these 4 starting points. In fact, we only have to pass in four numbers (the left, top, right, and bottom indices) from which we can derive the coordinates of the 4 corners of a square.
- What the recursive function does is to break the square into four subSquares by computing the location of a point right in the middle of the original square. (if I weren't so lazy, I would draw a picture). It has to (randomly) determine the altitude of the center point (the original four corner altitudes are known), and then the function CALLS ITSELF four times, once for each subsquare.
- When the function first gets called, it checks how big the square is that it has been asked to deal with (getting smaller by half for each recursive call). When it sees the size is too small, it doesn't bother to recurse any further. The overall shape of such a function is this:
		MyRecusiveFunction(int left, int top, int right, int bottom)
		{
			int midx = (left + right)/2;
			int midy = (top + bottom)/2;
			if ( midx < 2 )
				return;	// no point going smaller than this
			// now recurse to the four subsquares by calling ourselves
			MyRecursiveFunction(left, top, midx, midy); // nw
			MyRecursiveFunction(midx, top, right, midy); // ne
			MyRecursiveFunction(left, midy, midx, bottom); // sw
			MyRecursiveFunction(midx, midy, right, bottom); // se
		}
- The trick is to pick a sensible altitude for the new middle point, given the altitudes of the four corner points. There are many strategies for doing this, but what synVista is doing in the image above is simply taking the width of the square and dividing it by 4 or so (maybe it's 8, I forget) and then randomly picking to place the point either above or below the average altitude of the four corners. For example, if alt1, 2, 3, 4 are the altitudes of the four corner points of a square(in centimeters), and 'width' is the number of centimeters along one side of the square, the new altitude would be:
newAltitude = (alt1 + alt2 + alt3 + alt4)/4 + (width/8)
or
newAltitude = (alt1 + alt2 + alt3 + alt4)/4 - (width/8)
- You would use a random number to decide which to pick. A random number will give you something looking like a real mountain. If you always pick the ADD (as opposed to the subtract) you get a pillowy, cloudy sort of look. You can also use a random percentage of the width (instead of dividing by 8), but in general you will want the delta in altitude to be proportional to the width (i.e. smaller squares getting flatter deltas) or you will end up with just random noise which doesn't hang-together visually.
- So, you just do this recursive trick until its natural conclusion and then you're done. For a large database, this will be a slow operation, but you only have to do it once when you create the world. Because I was writing a C++ application, I created a new class, called CWorld, and put in methods for this fractalizing and other basic database access methods.
- Now, the thing I always forget! (well, twice so far). Even though it feels like you have created only one new point (the one in the middle), you have actually created FIVE new points at each step of the recursion (the ones in the middles of each of the four sides of the square). You have to be sure to set THEIR altitudes, as well. (You can thank me later.) Since these four points are actually shared with the squares next to this square, you actually only need to compute the altitude of 2 of them. It can be a little confusing to decide which two, since it is relative to the order in which you make your four recursive calls. I'll let you work this out on your own, since frankly I ended up almost randomly assigning things until it worked. (I was a little panicked at the time).
Lissajous patterns and camera location/viewport:
- I created another class, called CCamera, so I could maintain different cameras, each looking at the world from a separate location and looking in a different direction (though synVista only used a single camera). It was a nice abstraction and I'd like to think I thought of it myself, but I have seen it in other 3D engines, so I am a lowly imitator.
- A camera has a position in space (the X, Y point of the world over which it hangs, the altitude (Z) of the camera, and some orientation values (heading, pitch, yaw). One side-effect of the simplified math used by synVista is that I cannot pitch up and down more than 80 degrees or so, and I cannot 'roll' at all, though my yaw is unlimited. It's not that I don't know how to do 3D transformation of bases (hey, I took linear algebra!), they just weren't fast enough and weren't compatible with the ray tracing algorithm I invented in the car. Yeah, I feel guilty about it, but it met my goals at the time.
- The ORBIT command just moves the camera's (X,Y) location in real time, but leaves its altitude and orientation alone. The terrain following option just forces the camera's altitude to the world's altitude at that (X,Y) (plus a little to accomodate your standing height - the camera is your eyeball, so I put it 2 meters above the ground).
- A lissajous pattern is something cool we used to do in highschool electronics class, where we fed a sine wave of one frequency into the X axis of an oscilloscope, and a sine wave of a different frequency into the Y axis. When the frequencies match, and are in the proper phase, you get a perfect circle. As you vary the phase, the circle appears to 'rotate' along a 45 degree axis. If you double the frequency of one axis, you get a sort of figure eight. I basically use a frequency combination of 5 and 7 (prime numbers chosen on purpose) to make a lissajous pattern which has a certain level of complexity, but which is provides fairly even coverage. For example, say 'theta' is an angle which we slowly increment over time (the rate of increment will control our perceived velocity over the landscape). Then the camera's new position is:
x = WidthOfWorld * sin(Theta * 7);
y = WidthOfWorld * sin(Theta * 5);
- fiddle with the various scalars till you get something you like. Math people might be shocked that I didn't use a cosine for the X component, but I wasn't trying to center the pattern. But you could do that if you liked. Perhaps I did myself, I don't remember. (I actually have to scale and offset this vaue a little since a sine function returns values in the range -1 to +1 which means the above would actually span twice the world's overall size, but I didn't mention that for clarity).
Ray-Tracing and Rendering Algorithm:
- The third class I created was the CVista class. This class owns the actual display window and handles rendering a particular CWorld through a particular CCamera object. Think of the display window as being a piece of glass held a distance in front of the camera (eyeball). If the glass is held farther away, then a smaller amount of the world appears through the glass. But this glass is actually a computer screen and your distance to the glass is different from the camera's position. So you still see the glass the same size, even as the camera pulls back.. so to YOU it looks like you are zooming in on the world. I mention this just to confuse you, and to explain that the ZOOM is controlled simply by setting the distance between the camera and the glass.
- The glass can be thought of as a series of columns. For example, if the view size were 400 x 200 (400 wide by 200 high), then it is made up of 400 columns of 200 vertical pixels each. The rendering algorithm renders each column separately. If you stood above the camera/glass pair and looked straight down, you could see that a line could be drawn from the center of the eyeball (ow!) through one column of the glass, and out into the world. The line drawn through the center column of the glass would shoot out more or less 'straight ahead' of the viewer. The line drawn through the far left column of the glass would go off 'to the left'
- What I do is determine the line for each column (one after the other) and then project that line out into the distance until I get tired of doing it (or until it steps off the end of the fractal database). I use the initial distance from the eyeball to the glass column (dX being the 'left-ness' of the column, and dY being that ZOOM distance between the glass and the eyeball). I start at a point in the database just below the camera, and step that point 'forward' by adding dX, dY to it for each step.
- At each step, I find the closest fractal database cell, and get it's altitude. Then I 'map' that altitude to where it would show up on my screen, then I decide if I should draw it, then I pick the color, and then I draw it. Basically, by shooting out this way from the closest points to the farther points, I automatically avoid drawing things which are on the 'far side' of the mountain because once I draw a pixel on the screen I am not allowed to draw another pixel in the same spot. If you will. I keep track of the highest numbered pixel in the column and won't draw anything below it.
- Since I am not stepping through every possible centimeter of the world, I end up with 'gaps' on the display column. For example, I might have mapped on world point to a spot 3 pixels up on the column, but the next world spot is 8 pixels up. How do I fill in the interventing pixels?
- Well, I am going to keep secret my super plan for this (heh heh), but basically the shader handles it. The shaders you see today either do nothing (leave the intervening pixels black) or just paint them all the same color as the top pixel.
- To 'map' the world datapoint to where it would land on the screen is quite simple in synVista. (the 'correct' way would be to use a 3x3 'cosine matrix' to remap the coordinates of the world point to a coordinate system which had the cameras location as its origin and whose axes were rotated to the orientation of the camera). But that is 9 multiplies of floating point numbers and I chose to not do that (yet).
- By constraining my camera to have no 'roll', and severly limiting the 'pitch' (and assume for the moment the heading is always 0 degrees), I can basically live in a world where that transformation of bases has already taken place, and all I have to do is the simple similar-triangles trick to find the point on the screen. Givem that I already know the 'x' position on the screen (it's the column I am currently working on, which dtermined that orifinal line I stepped out into the world ahead of me), I only need to compute the height of the point on that column. Assuming 'Alt' is the altitude of the camera above the world point (camera altitude - altitude of world point), 'D' is the distance from the camera to the world point, and 'y' is the height in the column that I want to find out, and Z is my zoom factor (distance from eyeball to view screen), then the computation is just:
y = Z * (A/D)
- Watch out for dividing by zero, and make sure your units match. Also, if doing integer math, you will probably get fewer roundoff errors if you do the multiply before the divide, as in (Z*A)/D.
- The distance, D, could be a problem normally, since a good distance calculation requires a square root. However, in this case, I can just use the Y value of that line I am stepping out into the world (cool, huh!). There is some distortion, but much less than I expected and completely tolerable.
- What about YAW, I hear you asking? Well, I couldn't live without infinite yaw, so here is what I do. Basically I am just trying to come up with the correct dX, dY stepping vector to shoot out into the world. I start with an initial dX,dY which is just the camera relative to the column of the glass. Then, I ROTATE that vector by my heading. This requires multiplying by a 2x2 matrix, which is bad, but only once per column, which is good. The math is straight trigonometry (but I had to look it up anyway, in my big Chemical Rubber Company "Standard Mathematical Tables" which I got in highschool back when we used SLIDE RULES and didn't have CALCULATORs, at least not ones with transcendental functions. It's a great book.) At the risk of getting it wrong here, to compute a new x,y (call them x',y') by rotating a given x,y around the origin (which is what I want, where theta is the angle of my 'heading'), you do this:
x' = x * sin(theta) - y * cos(theta)
y' = x * cos(theta) + y * sin(theta)
- Um, that's from memory, so check the book! Anyway, I could afford the calculation once per column, so it worked out just fine. After doing this, you just step dX', dY' into the world and you're on your way!
- In the synVista you see above, I am simply stepping this distance until I fall off the end of the world. My plan (ok, so I can't keep a secret) is to do a binary search (in WORLD steps) to fill in the missing pixels on the column (in MAPPED steps)
Shading and Texture Mapping:
- So, fine, now, how do you pick a color?
- Good Question. Remember that as I step out into world space, I have easy access to eeach database 'cell' I step into. In each cell is not only an altitude, but also a texture index. (and eventually a lighting thing so I can properly shade for sunlight). When I am creating the world, I do a couple extra things in addition to simply computing the altitude. First I clip the altitude to 0 if it is negative. THat gives me the islands in the sea look I wanted. (note: don't do the clipping in the middle of the recursive fractal algorithm. Let the numbers go where they will). Also, while I am looking over the altitudes, I decide which texture that point should have (water, sand, dirt, meadow, conifer, or snow). I just use the altitude for that, but a little extra fractalness there would be nice. Also, I need to compute the surface normal at that point to get the lighting right. I don't mind doing expensive math during the creation of the world. The more you can do at creation, to simplify real-time display, the better.
- Each texture has a separate bitmap (128x128) which I created with Bryce2 (a terrific program).
- Remember as we step that line into the world, it lands on centimeter boundaries. We have to compute the closest meter boundary ( meters >> 7 == centimeters in my world of 128 centimeters to the meter). From the meter boundary, we look up the closest database cell. That cell tells us which texture bitmap to use. But the texture bitmap has 128x128 pixels in it, which shall we use? Well, let's use the right one! Our position is in centimeter accrutacy. the bitmap is centimeter accuracy. hence (x & 0x7F, y & 0x7F) is the exact offset into the bitmap we need (our position is x,y) Woo hoo!
- So we just pick up the color from the bitmap at that offset and that's the color we stick on the screen. Since we are doing all this in 'world space' we don't have to do any scaling at all and the texture bitmap gets mapped perfectly!
So, I know this is a lot more boring and unimpressive for you as it is for me. I just felt really good about achieving a personal dream, even though I had to wait till desktop computers were supercomputers to achieve it. Even back on the 386 there were games already achieving this level of beauty through clever programming. But I hope you enjoy it a little.
COPYRIGHT
synVista is the property of Synthetic Reality and all rights are reserved. If we can figure out a way to convince people to pay for this, you can be sure we'll give it a try. But for now it is expressly intended to provide a moment of joy for the math geeks in the audience, looking for number-crunching programs to show off their power computers!
Thanks for your feedback in advance!
Dan Samuel
Synthetic Reality Co.