 |
| Empyrion |
How To Play
Making New Empires
Making New Maps
Unit Properties
Toy Status
Community:
Forums
Java Chat
Firewall/Router Help
Arcadia Toys:
Collaboration
DomiNation
Empyrion
synChess
synJam
synJet
synPool
synSpades
synSpace
synVille
synVideo
Turnabout
Other
Games:
Well of Souls
Warpath
Rocket Club
Developers:
TurnAbout API
New Parks
New WoS Worlds
Rocket Club
Models
Company:
Synthetic Reality
Golden Souls
Donate $
Contact Us
| Empyrion is one of the free toys
which can be played in Arcadia. It is a multiplayer
Real Time Strategy (RTS) game for up to eight
players. If you've ever played an RTS before,
this will seem quite familiar. Empyrion includes
map and empire editors so you can extend the game
on your own and share with friends.
|
||||||||||||||||||||||||||||||||||||||||||||||||||||||||||||
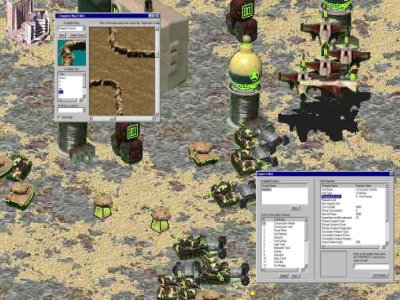
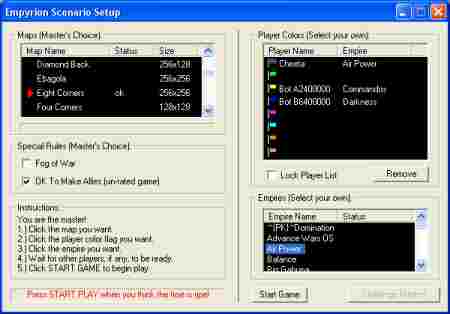
How To Play: After joining the channel, you will see the Scenario Setup Dialog. One of the players on the channel is the "Master" and gets to pick the map everyone will play on. If you feel the current master is dawdling, you may challenge them for mastery. Setup Each player picks one of the eight available 'flag' colors (which determine where on the map you will start), and one of the available 'empires' (which determine what sorts of units you will be able to build).
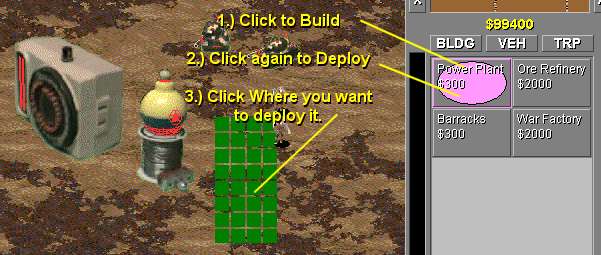
The moderator has the final say over who will be allowed to play and any special options (like fog of war) which are to be in effect for this match. Fetching Maps and Empires If the moderator selects a map you do not have, you may fetch a copy by right clicking on the map name and selecting 'Fetch Map' If any player selects an empire you do not have, you may fetch a copy by right-clicking on the player name and selecting 'Fetch Empire.' If you see two question marks next to an empire name, it means that while you have an empire of that name, it is DIFFERENT than the copy the other player has. You'll need to work out which of you has the newer/better version. Launch and Initial Factory Deploy When everyone is ready, the master launches the game and everyone starts with some units. One of those is very important as it is your 'construction vehicle' (actual name will vary with the empire you selected).
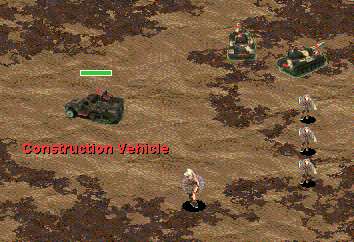
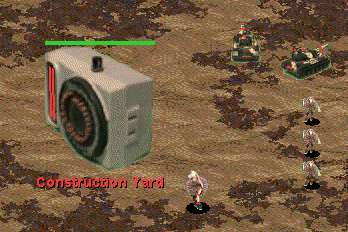
Drive your construction vehicle to the spot you want to use as the center of your base and then 'deploy' it (by clicking on it again while it is already selected). It will then turn into a building and your 'factory buttons' in the lower right will become active.
If you enter the channel after the game has begun, you will be synchronized to the action so far and can then be a spectator for the rest of the match. Building Units You can build three different types of units: Buildings, Vehicles, and Troops. But each unit requires some other unit to exist before it can be built. For example, you can't build a power station until you have deployed your factory vehicle. You can't build troops until you have build some sort of barracks. You'll learn the nature of your empire by experimentally building units and seeing what happens.
Be sure to build enough power stations. If your power meter ever goes completely red, the speed at which you can build additional items will be very slow. Also, keep an eye on how much money you have and how much units cost to build. You get more money by building resource-harvesting units (such as Ore Refineries). In a pinch, you might be able to sell a building to get some of your money back. (Click on the $ button in the upper right, then on the building you wish to sell.) Moving Units Once you have built vehicles or troops, you can command them to walk around on the map by selecting them, and then clicking on a destination (either in the main map, or in the mini-map in the upper right).
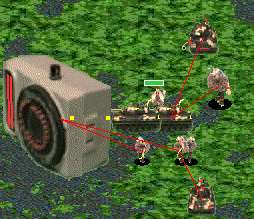
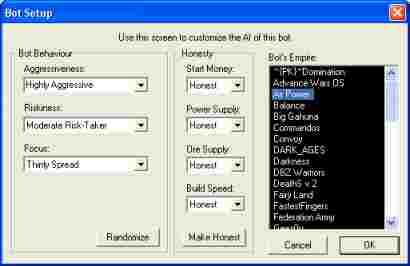
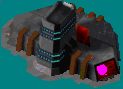
As you can see, you can make new units out of anything. For example that war factory on the right is a bottle of ink upside down on top of the voice unit pulled from my A.G. Bear toy, along with an old bicycle brake pad. Selecting Units Click on an individual unit to select it. You can drag-select a group of units so long as nothing is selected when you first start dragging. SHIFT-clicking on a unit adds or subtracts it from the current selection. Holding the CTRL key and an FKey at the same time 'binds' the current selection to that function key. Later you can reselect those units simply by pressing that FKey. To deselect all units, press the RIGHT mouse button. Death and Destruction When you move a unit close to an enemy unit, it will automatically start shooting (or dying, as the case may be) without any effort on your part. The fun comes from figuring out which units work well in combinations against other units. Each unit has a life meter showing how much life it has left. When only one player (or alliance) has any units left, the game is over. Bots If you like, you may add bot players to the match before it starts. (the moderator right-clicks in an empty slot of the setup dialog and selects to add a bot to that slot)
Bots can be tweaked for varying levels of intelligence and honesty. (an honest bot works with the same restrictions you do. Dishonest bots can be given a boost in their money, power, build speed. While this is unfair, they are, after all, just bots, so they probably deserve a few advantages. Alliances If the moderator has enabled it, you may form alliances with other players by right-clicking on their name in the player list and selecting "Form Alliance." You may review existing alliances by holding down the MiniMap "A" button. Your units will not shoot at allies. (be sure to get your ally to ally back however, as this is a unilateral effect) |
||||||||||||||||||||||||||||||||||||||||||||||||||||||||||||
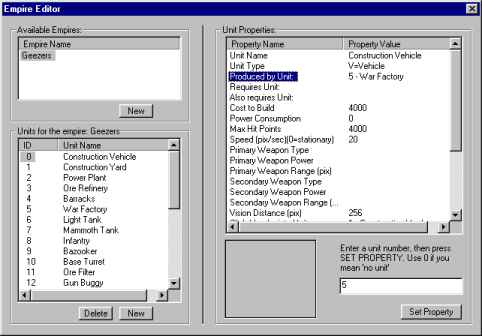
Making New Empires: You might want to try your hand at creating your own empire design. From the Toy Preferences Dialog you can access the Empire Editor. This editor allows you to tune an existing empire, or create a brand new one.
Add Empire (Name it) To make a new empire, press the New Empire button (duh!) and give it a name. Note that if you use the same name as someone else's empire, the system won't make any particular effort to keep things straight. If nothing else, this is a good reason to back up your work in a separate folder from the game itself. Add Units to Your Empire (Name Them) Once you have defined your new empire name, you add 'units' to it. Units are buildings, people, or vehicles. Each unit gets assigned a number and the list on the left shows you the id number of all the units in the selected empire. You'll need that id number later. Each unit needs a cool name. Assigning/Editing Unit 'Properties' When you select an individual unit, its "properties" are shown on the right. For the most part, I hope these make sense from their descriptions. But you will probably learn a lot by examing existing empires. Note that you do NOT have to define every property for every unit. At least one of your units should have the property "start with this many" set to something above zero. Only those units are doled out to the players at the start of the game. For each unit, you will definitely want to set its name, image, and whether it is a building, a person, a vehicle, or some sort of aircraft. Rather than explain all the properties here, I think I will just let you play around. (OK, later on I describe all the current properties in more detail) Unit Image Bitmap Probably the most important property of your unit is its appearance, since if it doesn't have an image, no one will even see it. A stationary building unit will have a simple single image (of the building, at a 45 degree angle, imaged from a 45 degree line above the building, for everything to make the most sense).
Mobile units generally have an image which is a filmstrip of 16 frames.. something like this (only pretend you see 16 frames here, showing it turning in a full circle)
A different image is used, depending on which direction the unit is headed right now. The first image in the filmstrip (image 0) should be facing 'due south', image 4 is due east, image 8 is due north, and image 12 is due west. The other images should be 'equal angle interpolations' between those compass points. For MY images, I made a little lazy susan sort of contraption with angle markers on it so I could rotate models in front of a little web cam. A cooler person would use 3D studio max... (Also, for 'walking' units, there is an option to add a little 'jitter' to make the unit sort of sway from side to side to make it look a bit more like it is walking) Morphing Units (from one id to another) One cool feature, generally used for your starting "mobile constuction vehicle" is the deploy/morph property. If a unit has that, then your cursor changes to a special deploy cursor when you point at the unit, and clicking on it causes it to 'morph' (instantly) into a different unit. So the MCV is actually two units. A vehicle form which then morphs into a building form (with a totally different unit id number). You can create complex chains of morphing. Plus you can have some morph transitions happen automatically (say, after spending some time in one form, the unit automatically switches to another) Factories (How the Player Makes Units During the Game) Units are generally 'manufactured' by other units, and may require additional units to pre-exist. For example, a special tank is made by a certain factory, but only if you also have some research facility (which itself required something else). So you can make pretty complicated chains of dependencies for technological development of your empire. So, after defining your units be sure to specify:
Refineries (How the Player Makes Money During the Game) Manufacturing new units costs money. Each player starts the game with a small amount of money, but during the game they must build 'refinery' units which harvest some un-named material from the ground and convert it to money. In a pinch you may also be able to sell some units. Any unit can be a refinery (just specify a couple properties which determine how often it generates cash, and how much cash in generates.) You can provide a negative value to make a unit actually CONSUME cash periodically. Power Stations Your factories consume electricity in order to manufacture and maintain units (unit properties define how much power each unit consumes or creates) Most units consume power, so as you add units to your army, you need to add a matching amount of power generation units, to keep your power meter from ever going red (at which point manufacturing drops to a glacial pace.) Getting Started as an Empire Designer You might want to get familiar with the system by making a copy of some other empire and then fiddling with the properties of its existing units. Empires themselves are each defined by a single file in the Empires folder. (so duplicate and rename one of those files to make your experimental empire). Then open the Empire Editor, read the details of the properties of existing units and try experimentally modifying them (remember, modify your COPY of the empire, not the ORIGINAL), then playing a short game with yourself to see what happens and if you like it. Once you're comforable with how the editor works and what each of the properties are used for, then you can start thinking about making a balanced empire (an UNbalanced empire is one where you just make every unit a super unit with infinite strength and power. NO ONE WILL WANT TO PLAY WITH YOUR EMPIRE if you do that. At least not more than once. Games are more fun when you have to make tradeoffs, like "THIS unit has an amazing cannon, but it has no armor protection at all. I will give it long range so it can stand back from danger, but it will be sensitive to opponents with rapid armored vehicles running right up to it and destroying it. Maybe I will also give it a long cool down time between cannon shots" Try to have a rock/paper/scissors mentality when designing units and have your empire contain a mix of units which are specifically good against some units and weak against others. If you DO have super units, make them only available at the end of a complicated technology chain (the atomic super gun requires the super gun factory which also needs a super rivet factory and that can only be operated by super riveteers and they are made only by a super barracks which requires huge amounts of power and money.) Weapons (How units hurt each other) For each unit you can specify weapon type, power and ranges, but in addition to those there are some hardwired capabilities which make certain weapon types more effective against certain other types. Here is a table showing the current settings. You cannot change this (short of convincing me that it is wrong).
The numbers in the table mean "percentage effective." So, a machine gun is only 15% effective against a building. So if a particular unit has a machine gun with a power of 100 hit points, only 15 hit points will get applied to a building shot by that unit. Each weapon can be bound to its own sound effect and 'explosion animation.' (though I leave it up to you to figure out exactly how that is done!) |
||||||||||||||||||||||||||||||||||||||||||||||||||||||||||||
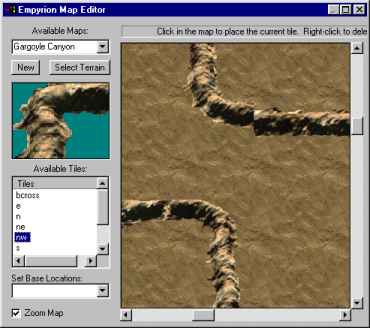
Making New Maps: Also from the Toy Preferences Dialog, you can access the Map Editor. This editor allows you to edit an existing map, or create a brand new one.
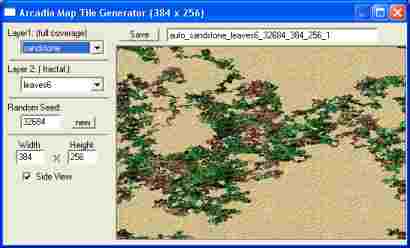
Maps are still pretty simple, and would benefit greatly from a talented texture artist creating some reusable art assets (hint, hint) A map consists of a base texture which is 'tiled' (copied over and over as necessary to fill the entire map). These textures are stored in a folder called "Terrains" and should be jpeg files. They can be any dimensions you like, including large enough to cover your entire map. However that would be a large file and people might not want to wait for it to be shared between the players. What am I saying, people would LOVE that! But this base texture, as pretty as it is, has no 'information.' I mean, units can walk unobstructed across this texture, no matter what the image might otherwise imply. If you draw a river, or a mountain, on this base texture, it will NOT prevent units from moving across it. Terrain Texture Editor A Terrain Editor is provided with which you may make interesting terrain textures by fractal-blending two simple textures:
I am, of course, insanely proud of this little widget, as it allow you to define a pretty attractive base texture and only end up sending a couple numbers to the other players (instead of a large image file). They then (automatically) synthesize a matching texture image from those numbers. Also, it's easy and fun to use! Just select a pair of images and a random number and it does the rest. Use the side-view checkbox for Empyrion backgrounds since that will make them look like that '45 degree angle camera position' makes sense. When you have something you like, press SAVE (and don't change the file name, since the name is how the other players manage to recreate the same image). Once you save it, it will be available to the Map Editor via the 'select terrain' button. Map Tiles (obstacles you add to the base map, to limit movement) On top of the base texture, you place individual 'tiles.' These are small images stored in the "Tiles" folder. They must be .bmp files using the synthetic reality standard 256 color palette (see Well of Souls Custom Skins). The layout of an individual tile can be anything you like (there are no size restrictions, I mean). But the top left pixel of the file is the 'transparent' color and all other pixels of that color will be transparent. When you place one of these tiles on top of the map somewhere, you are adding a barrier of some sort. So these tiles should 'look like' mountains, rivers, or other things you don't want units to be able to cross (unless they are flying units, of course). Units WILL be able to cross transparent pixels in the tile, however. Unlike the crummy tiles that *I* made, I suggest a talented artist should make base textures and tiles which imply a 45 degree viewing angle (similar to the building and units). The idea is for you to place enough tiles so as to created limitations on units abilities to get between different areas of the map. For example, natural 'fences' for the players to protect their bases with. |
||||||||||||||||||||||||||||||||||||||||||||||||||||||||||||
Unit Properties: At the risk of documenting a moving target, here is a description of the current unit properties. Some properties are associated with assets (images or sound effects) which need to be saved as files in the proper location. These will be in your 'toy4' folder which, for a typical installation of Arcadia, is located here:
Please interpret what follows in that light. Use the PROPERTIES section of the EMPIRE EDITOR to alter properties of individual units. Unit ID (0-255) Every unit in your empire must have a unique ID number. These are assigned for you automatically when you press the NEW (unit) button on the Empire editor. You are limited to a total of 256 unit IDs per empire. (note: this is 256 POSSIBLE unique unit designs. During the game, the players will choose which of those units they actually want to make, and will probably make large numbers of specific designs (like 50 tanks, all of which are unit id 32) Name Every unit can have its own name. If it serves some sinister purpose, you can re-use the same name on several units. (for example a morph-chain where clicking repeatedly on a unit morphs it in a cycle of N units... say #2 --> #34 --> #12 --> #2 and you wanted them all to appear to be the same unit (have the same name). Unit Type Here you specify what sort of thing the unit it. Building, Factory, Soldier, Aircraft, etc. Amongst other things this will determine what weaponry the unit is sensitive to. 'Produced-By' Unit This is the Unit ID of the 'factory' which maufactures this unit (for example, your soldiers might be manufactured by a barracks unit while your airplanes might come from a vehicle assembly unit). A newly minted unit appears on the map near its factory. (If you have more than one instance of the factory, only one of them is the 'primary' factory at any given time. You can re-designate a factory as being primary by selecting it and then clicking on it again (and yes, this conflicts with morphing, so good luck!) 'Requires' Unit This is the ID of another unit which the player must have built before they can build this unit. For example an "Advanced Jet Fighter" unit might have an "Airbase" as its factory unit, but also require a "Research Lab" and an "Advanced Fuel Depot" unit to have been deployed before it can be manufactured. You can specify several 'require' units. Cost To Build You are charged this much to manufacture the unit. If you cancel construction before the unit is deployed, then you can recover these funds. Power Consumption The unit will consume this much power for as long as it exists (i.e. until it is destroyed). A negative value means the unit GENERATEs power. Max Hit Points This is the size of the full 'life meter' for this unit. As it is attacked it will lose hit points until eventually it is dead and gone. Speed This is how fast a unit may move (0 means it is stationary). Weapon Type Each unit optionally may have a primary and/or a secondary weapon. The type of the weapon (missile, rifle, bomb, etc.) determines what units it is effective against (see table above). Weapon Power The number of hit points of damage the unit inflicts (A negative value here means it actually heals the unit it 'attacks'). Actual damage delivered will be less than this based on distance, accuracy of shot, effectiveness of weapon type on target, etc. Weapon Range How far (in screen pixels) the weapon can shoot Weapon Recharge Weapons can be given an additional cool-down period (appropriate for super powerful weapons so they do not dominate gameplay) Weapon Targets Friendly Units This option lets you pick whether the weapon will preferentially attack enemy or allied units. Generally one would always attack enemies. The allied option is really intended for units with negative (healing) weapon power.. thus providing 'medics' and 'repair facilities' Weapon Chooses Best Effect (0-100) If this is non-zero, then the weapon will only consider attacking units against which it is at least this effective (based on the weapons effectiveness table). Hence a value of 50 means it would only attack units against which it was at least 50% effective, and not waste shots shooting at targets which were impervious to it. Weapon Strategy This lets you teach the weapon to prefer to attack the closest, strongest, or weakest target in range. (Remember, the player just moves the units around, they pretty much decide on their own when they will shoot). Weapon Sound Effect This lets you specify the sound effect which is played when that weapon fires. Sound effects are .WAV files (and for downloading purposes should be kept as small as possible. I suggest 11KHz mono files of 500 ms or less) Weapon Explosion Filmstrip This lets you specify an animation filmstrip of the explosion your weapon should cause to occur on the target. Check out the contents of Toy4/Weapons for an example. This must be a BMP file using the standard Synthetic Reality 256 color palette. It will be interpreted as 16 frames, played in order from left to right, at the location of the target. Don't forget your transparency pixels! Vision Distance In matches with Fog of War turned on, this setting controls how much fog is lifted in a radius around this unit. Once lifted, fog does not return for the remainder of the game. Click-Morphs Into Unit This is the unit ID of a unit into which this unit may be morphed. If a unit has a morph target then it will show the special morph cursor when you point to a selected instance of this unit. Whether the morph target itself morphs to something else (or back to the original unit) is up to you. The classic use of morph target is the tank which can be 'deployed' to a stationary 'dug-in' unit with greater defense (but no mobility). Costs This Much To Click Morph You may optionally charge money to do the morph. Insufficient Funds --> no morph. Morph Decays Into Unit This is like a click morph, only it happens automatically after a set period of time. You might use this to relax a powerup state (like click-morph to super-power-enraged monster unit, then morph decay back to normal unit.) Seconds Until Morph Decay This sets how many seconds until it morph decays. Morp decay can also be used to degrade units to imply wearing out.. For example a new unit which starts off strong, but as it ages it morph decays into weaker (or stronger) versions. Move0 Bitmap Sorry for the odd name. This is the image file to be used for this unit. It should be a 16 frame filmstrip showing the unit turning in a full circle. It should use a transparent background color for all pixels which are not the unit itself, and it should ideally NOT include any shadow below the unit (especially if the unit is an aircraft). Please check out the toy4/units folder for examples. Note that the image rules for a building/factory are different from mobile units. For mobile units frame 0 is the unit facing/travelling due south, 4 is east, 8 is north, and 12 is west. (with the other frames being the incremental rotations between those compass points) Remember the 'camera' is looking down at a 45 degree angle, so if your unit were a flat circle on the ground, the image would be of an ellipse which was only half as tall as it was wide. You can experiment with shadows, but it is probably best to NOT have any ground shadow included in your image art, especially for aircraft, since the game will auto-render ground shadows, and the distance 'above the shadow' is the primary visual clue for the aircraft's current location. Base Height For a building unit, this controls how much of the building is 'on the ground' in the sense of do nearby units appear to be in front of it, behind it, below it, or on top of it. Please review some existing empires to get a feel for how this works. Turret Bitmap Some units, like tanks, look cooler if their primary weapon is associated with a rotating turret (which points in a different direction to the direction of travel). If you provide this bitmap, then it will be drawn 'on top of' the Move0 bitmap in such a way as to track the primary weapon heading. You will need to provide a full 16 frames for this bitmap, again with frame 0 being the turret aiming 'due south', frame 4 'due east', frame 8 'due north' and frame 12 'due west' Swagger-Walk For 'walking' units this controls the algorithm used to pick which frame to use for each step of the walk cycle (the Move0 bitmap is still just a 360 rotation of the unit, so the walk cycle is mainly a swaggering of the 'hips' back and forth a bit from the primary unit travel heading. Start With This Many This lets you indicate how many of this unit are given to the player at the start of the match. There is an overall limit to the total number of units at start of match, so don't go crazy now. Ore Amount This is intended for resource-collection units and indicates how much ore (how many dollars worth) are collected for each 'load'. A negative value means the unit will actually consume money instead. Ore Timing If the Ore Amount is non-zero, then this is how many seconds there are between 'loads.' I think of this as some sort of mining apparatus which takes this many seconds to pull a load of ore up from a hole in the ground and then pours "Ore Amount" of money into your pocket when the load arrives. Pad Type This works together with Base Height to complete the flexibility of buildings which stick up from the ground, versus those which lie flat on the ground (runways, for example). Well.. ok.. maybe this does nothing. I guess I added it originally to have the concept of pads which did something useful, like repair vehicles parked on them. The way I would do that today is give the pad a very short range negative damage weapon of a class which was effective against vehicles and an AI that caused it to target the weakest friendly unit in range. Other Properties If you are staring at the property editor right now and seeing something not documented above, or which appears to differ from the documentation above, well, then I'm sorry. |
||||||||||||||||||||||||||||||||||||||||||||||||||||||||||||
Toy Status: It is a complete game, in the sense that it can be irritating to lose. Feel free to check out the unit bitmap files (in the folder: ..arcadia\toys\toy4\units) and come up with some new ones. Recent Developments: With the addition of "fog of war" the original design feature set is complete. Now we're in the phase of "infinite amelioration." To Install Toys:
|